Arduino: IDE, I/O Functions,
The Arduino Integrated Development Environment (IDE) has several functions for input/output (I/O) on an Arduino board, including:
- pinMode(): Configures a pin as an input or output. The syntax is
pinMode(pin, mode). - digitalWrite(): Used to work with digital pins.
- digitalRead(): Used to read an input pin. The value returned by this function can be unpredictable if the input voltage isn't close to VDD or 0V.
- attachInterrupt(): Used to configure pins to trigger an interrupt on a low value, a rising or falling edge, or a change in value.
- analogWrite(): Used to provide 8-bit PWM output.
- The Arduino Uno has 14 digital pins that can be used as inputs or outputs.
- Each pin can provide or receive 20 mA.
- The maximum value that should not be exceeded on any I/O pin is 40 mA to avoid damaging the microcontroller.
- Some pins have specialized functions, such as Serial, External Interrupts, PWM, SPI, LED, and TWI.
- To steer an input pin to a known state when no input is present, you can add a pullup resistor to +5V or a pulldown resistor to ground
- Used to execute statements a set number of times. The loop's control expression is initialized, tested, and manipulated within the for loop parentheses. For example, you can use a for loop to blink a light a specific number of times.
- Used to stop everything in the program while a given condition is true. For example, you can use a while loop to calibrate a sensor while a button is being read.
- Used to loop consecutively, allowing your program to change and respond. You can use it to actively control the Arduino board.
- Used to exit from a for, while, or do…while loop, bypassing the normal loop condition.
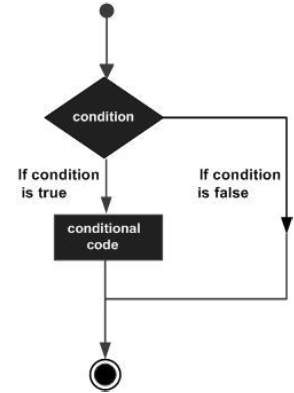
Decision making structures require that the programmer specify one or more conditions to be evaluated or tested by the program. It should be along with a statement or statements to be executed if the condition is determined to be true, and optionally, other statements to be executed if the condition is determined to be false.
Following is the general form of a typical decision making structure found in most of the programming languages −
Control Statements are elements in Source Code that control the flow of program execution. They are −
| S.NO. | Control Statement & Description |
|---|---|
| 1 | It takes an expression in parenthesis and a statement or block of statements. If the expression is true then the statement or block of statements gets executed otherwise these statements are skipped. |
| 2 | An if statement can be followed by an optional else statement, which executes when the expression is false. |
| 3 | The if statement can be followed by an optional else if...else statement, which is very useful to test various conditions using single if...else if statement. |
| 4 | Similar to the if statements, switch...case controls the flow of programs by allowing the programmers to specify different codes that should be executed in various conditions. |
| 5 | The conditional operator ? : is the only ternary operator in C. |
- To communicate with four boards using UART, you can configure the main board and the peripheral boards:
- Main board: Open a new sketch and name it as Nano_4_UART_transmitter. Include the SoftwareSerial library and name the UART ports.
- Peripheral board: Open the Arduino Cloud Editor and connect one of the Arduino Nano Every boards to the computer. Name the sketch Nano_4_UART_receiver. Initialize the built-in LED as OUTPUT and turn it off. Initialize the UART communication with the main board using the Serial1.
- Main board: Open a new sketch and name it as Nano_4_UART_transmitter. Include the SoftwareSerial library and name the UART ports.
- In an SPI connection, a controller device controls the peripheral devices. The SPI pins include:
- MISO: Pin number 50 is used as a Master In Slave Out
- MOSI: Pin number 51 is used as a Master Out Slave In
- SCK: Pin number 52 is used as a Serial Clock
- SS: Pin number 53 is used as a Slave Select
- MISO: Pin number 50 is used as a Master In Slave Out
- You can program two or more Arduino boards to communicate with each other using the I2C synchronous serial protocol. One board acts as the controller and the other acts as the peripheral receiver.
- You can learn how to interface with sensors and actuators, including the circuitry and Arduino code needed to communicate with them.
Functions allow structuring the programs in segments of code to perform individual tasks. The typical case for creating a function is when one needs to perform the same action multiple times in a program.
Standardizing code fragments into functions has several advantages −
Functions help the programmer stay organized. Often this helps to conceptualize the program.
Functions codify one action in one place so that the function only has to be thought about and debugged once.
This also reduces chances for errors in modification, if the code needs to be changed.
Functions make the whole sketch smaller and more compact because sections of code are reused many times.
They make it easier to reuse code in other programs by making it modular, and using functions often makes the code more readable.
There are two required functions in an Arduino sketch or a program i.e. setup () and loop(). Other functions must be created outside the brackets of these two functions.
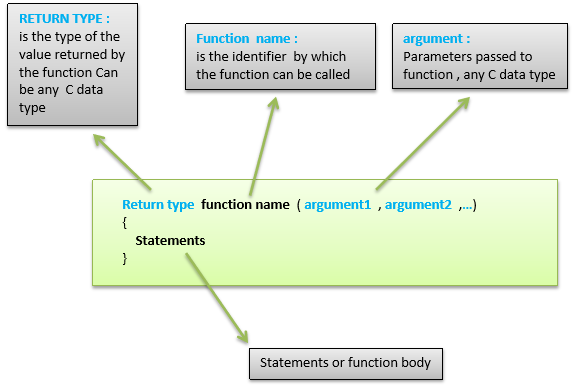
The most common syntax to define a function is −
Function Declaration
A function is declared outside any other functions, above or below the loop function.
We can declare the function in two different ways −
The first way is just writing the part of the function called a function prototype above the loop function, which consists of −
- Function return type
- Function name
- Function argument type, no need to write the argument name
Function prototype must be followed by a semicolon ( ; ).
The following example shows the demonstration of the function declaration using the first method.
Example
int sum_func (int x, int y) // function declaration {
   int z = 0;
   z = x+y ;
   return z; // return the value
}

void setup () {
   Statements // group of statements
}

Void loop () {
   int result = 0 ;
   result = Sum_func (5,6) ; // function call
}
The second part, which is called the function definition or declaration, must be declared below the loop function, which consists of −
- Function return type
- Function name
- Function argument type, here you must add the argument name
- The function body (statements inside the function executing when the function is called)
The following example demonstrates the declaration of function using the second method.
Example
int sum_func (int , int ) ; // function prototype

void setup () {
   Statements // group of statements
}

Void loop () {
   int result = 0 ;
   result = Sum_func (5,6) ; // function call
}

int sum_func (int x, int y) // function declaration {
   int z = 0;
   z = x+y ;
   return z; // return the value
}
The second method just declares the function above the loop function.
Strings are used to store text. They can be used to display text on an LCD or in the Arduino IDE Serial Monitor window. Strings are also useful for storing the user input. For example, the characters that a user types on a keypad connected to the Arduino.
There are two types of strings in Arduino programming −
- Arrays of characters, which are the same as the strings used in C programming.
- The Arduino String, which lets us use a string object in a sketch.
In this chapter, we will learn Strings, objects and the use of strings in Arduino sketches. By the end of the chapter, you will learn which type of string to use in a sketch.
String Character Arrays
The first type of string that we will learn is the string that is a series of characters of the type char. In the previous chapter, we learned what an array is; a consecutive series of the same type of variable stored in memory. A string is an array of char variables.
A string is a special array that has one extra element at the end of the string, which always has the value of 0 (zero). This is known as a "null terminated string".
String Character Array Example
This example will show how to make a string and print it to the serial monitor window.
Example
void setup() {
   char my_str[6]; // an array big enough for a 5 character string
   Serial.begin(9600);
   my_str[0] = 'H'; // the string consists of 5 characters
   my_str[1] = 'e';
   my_str[2] = 'l';
   my_str[3] = 'l';
   my_str[4] = 'o';
   my_str[5] = 0; // 6th array element is a null terminator
   Serial.println(my_str);
}

void loop() {

}
The following example shows what a string is made up of; a character array with printable characters and 0 as the last element of the array to show that this is where the string ends. The string can be printed out to the Arduino IDE Serial Monitor window by using Serial.println() and passing the name of the string.
This same example can be written in a more convenient way as shown below −
Example
void setup() {
   char my_str[] = "Hello";
   Serial.begin(9600);
   Serial.println(my_str);
}

void loop() {

}
In this sketch, the compiler calculates the size of the string array and also automatically null terminates the string with a zero. An array that is six elements long and consists of five characters followed by a zero is created exactly the same way as in the previous sketch.

Manipulating String Arrays
We can alter a string array within a sketch as shown in the following sketch.
Example
void setup() {
   char like[] = "I like coffee and cake"; // create a string
   Serial.begin(9600);
   // (1) print the string
   Serial.println(like);
   // (2) delete part of the string
   like[13] = 0;
   Serial.println(like);
   // (3) substitute a word into the string
   like[13] = ' '; // replace the null terminator with a space
   like[18] = 't'; // insert the new word
   like[19] = 'e';
   like[20] = 'a';
   like[21] = 0; // terminate the string
   Serial.println(like);
}

void loop() {

}
Result
I like coffee and cake
I like coffee
I like coffee and tea
The sketch works in the following way.
Creating and Printing the String
In the sketch given above, a new string is created and then printed for display in the Serial Monitor window.
Shortening the String
The string is shortened by replacing the 14th character in the string with a null terminating zero (2). This is element number 13 in the string array counting from 0.
When the string is printed, all the characters are printed up to the new null terminating zero. The other characters do not disappear; they still exist in the memory and the string array is still the same size. The only difference is that any function that works with strings will only see the string up to the first null terminator.
Changing a Word in the String
Finally, the sketch replaces the word "cake" with "tea" (3). It first has to replace the null terminator at like[13] with a space so that the string is restored to the originally created format.
New characters overwrite "cak" of the word "cake" with the word "tea". This is done by overwriting individual characters. The 'e' of "cake" is replaced with a new null terminating character. The result is that the string is actually terminated with two null characters, the original one at the end of the string and the new one that replaces the 'e' in "cake". This makes no difference when the new string is printed because the function that prints the string stops printing the string characters when it encounters the first null terminator.
Explore our latest online courses and learn new skills at your own pace. Enroll and become a certified expert to boost your career.
Functions to Manipulate String Arrays
The previous sketch manipulated the string in a manual way by accessing individual characters in the string. To make it easier to manipulate string arrays, you can write your own functions to do so, or use some of the string functions from the C language library.
The next sketch uses some C string functions.
Example
void setup() {
   char str[] = "This is my string"; // create a string
   char out_str[40]; // output from string functions placed here
   int num; // general purpose integer
   Serial.begin(9600);

   // (1) print the string
   Serial.println(str);

   // (2) get the length of the string (excludes null terminator)
   num = strlen(str);
   Serial.print("String length is: ");
   Serial.println(num);

   // (3) get the length of the array (includes null terminator)
   num = sizeof(str); // sizeof() is not a C string function
   Serial.print("Size of the array: ");
   Serial.println(num);

   // (4) copy a string
   strcpy(out_str, str);
   Serial.println(out_str);

   // (5) add a string to the end of a string (append)
   strcat(out_str, " sketch.");
   Serial.println(out_str);
   num = strlen(out_str);
   Serial.print("String length is: ");
   Serial.println(num);
   num = sizeof(out_str);
   Serial.print("Size of the array out_str[]: ");
   Serial.println(num);
}

void loop() {

}
Result
This is my string
String length is: 17
Size of the array: 18
This is my string
This is my string sketch.
String length is: 25
Size of the array out_str[]: 40
The sketch works in the following way.
Print the String
The newly created string is printed to the Serial Monitor window as done in previous sketches.
Get the Length of the String
The strlen() function is used to get the length of the string. The length of the string is for the printable characters only and does not include the null terminator.
The string contains 17 characters, so we see 17 printed in the Serial Monitor window.
Get the Length of the Array
The operator sizeof() is used to get the length of the array that contains the string. The length includes the null terminator, so the length is one more than the length of the string.
sizeof() looks like a function, but technically is an operator. It is not a part of the C string library, but was used in the sketch to show the difference between the size of the array and the size of the string (or string length).
Copy a String
The strcpy() function is used to copy the str[] string to the out_num[] array. The strcpy() function copies the second string passed to it into the first string. A copy of the string now exists in the out_num[] array, but only takes up 18 elements of the array, so we still have 22 free char elements in the array. These free elements are found after the string in memory.
The string was copied to the array so that we would have some extra space in the array to use in the next part of the sketch, which is adding a string to the end of a string.
Append a String to a String (Concatenate)
The sketch joins one string to another, which is known as concatenation. This is done using the strcat() function. The strcat() function puts the second string passed to it onto the end of the first string passed to it.
After concatenation, the length of the string is printed to show the new string length. The length of the array is then printed to show that we have a 25-character long string in a 40 element long array.
Remember that the 25-character long string actually takes up 26 characters of the array because of the null terminating zero.
Array Bounds
When working with strings and arrays, it is very important to work within the bounds of strings or arrays. In the example sketch, an array was created, which was 40 characters long, in order to allocate the memory that could be used to manipulate strings.
If the array was made too small and we tried to copy a string that is bigger than the array to it, the string would be copied over the end of the array. The memory beyond the end of the array could contain other important data used in the sketch, which would then be overwritten by our string. If the memory beyond the end of the string is overrun, it could crash the sketch or cause unexpected behavior.
What is an Object?
An object is a construct that contains both data and functions. A String object can be created just like a variable and assigned a value or string. The String object contains functions (which are called "methods" in object oriented programming (OOP)) which operate on the string data contained in the String object.
The following sketch and explanation will make it clear what an object is and how the String object is used.
Example
void setup() {
   String my_str = "This is my string.";
   Serial.begin(9600);

   // (1) print the string
   Serial.println(my_str);

   // (2) change the string to upper-case
   my_str.toUpperCase();
   Serial.println(my_str);

   // (3) overwrite the string
   my_str = "My new string.";
   Serial.println(my_str);

   // (4) replace a word in the string
   my_str.replace("string", "Arduino sketch");
   Serial.println(my_str);

   // (5) get the length of the string
   Serial.print("String length is: ");
   Serial.println(my_str.length());
}

void loop() {

}
Result
This is my string.
THIS IS MY STRING.
My new string.
My new Arduino sketch.
String length is: 22
A string object is created and assigned a value (or string) at the top of the sketch.
String my_str = "This is my string." ;
This creates a String object with the name my_str and gives it a value of "This is my string.".
This can be compared to creating a variable and assigning a value to it such as an integer −
int my_var = 102;
The sketch works in the following way.
Printing the String
The string can be printed to the Serial Monitor window just like a character array string.
Convert the String to Upper-case
The string object my_str that was created, has a number of functions or methods that can be operated on it. These methods are invoked by using the objects name followed by the dot operator (.) and then the name of the function to use.
my_str.toUpperCase();
The toUpperCase() function operates on the string contained in the my_str object which is of type String and converts the string data (or text) that the object contains to upper-case characters. A list of the functions that the String class contains can be found in the Arduino String reference. Technically, String is called a class and is used to create String objects.
Overwrite a String
The assignment operator is used to assign a new string to the my_str object that replaces the old string
my_str = "My new string." ;
The assignment operator cannot be used on character array strings, but works on String objects only.
Replacing a Word in the String
The replace() function is used to replace the first string passed to it by the second string passed to it. replace() is another function that is built into the String class and so is available to use on the String object my_str.
Getting the Length of the String
Getting the length of the string is easily done by using length(). In the example sketch, the result returned by length() is passed directly to Serial.println() without using an intermediate variable.
When to Use a String Object
A String object is much easier to use than a string character array. The object has built-in functions that can perform a number of operations on strings.
The main disadvantage of using the String object is that it uses a lot of memory and can quickly use up the Arduinos RAM memory, which may cause Arduino to hang, crash or behave unexpectedly. If a sketch on an Arduino is small and limits the use of objects, then there should be no problems.
Character array strings are more difficult to use and you may need to write your own functions to operate on these types of strings. The advantage is that you have control on the size of the string arrays that you make, so you can keep the arrays small to save memory.
You need to make sure that you do not write beyond the end of the array bounds with string arrays. The String object does not have this problem and will take care of the string bounds for you, provided there is enough memory for it to operate on. The String object can try to write to memory that does not exist when it runs out of memory, but will never write over the end of the string that it is operating on.
Where Strings are Used
In this chapter we studied about the strings, how they behave in memory and their operations.
The practical uses of strings will be covered in the next part of this course when we study how to get user input from the Serial Monitor window and save the input in a string.
Arduino provides four different time manipulation functions. They are −
| S.No. | Function & Description | ||||||||||||||
|---|---|---|---|---|---|---|---|---|---|---|---|---|---|---|---|
| 1 | The way the delay() function works is pretty simple. It accepts a single integer (or number) argument. This number represents the time (measured in milliseconds). | ||||||||||||||
| 2 | The delayMicroseconds() function accepts a single integer (or number) argument. There are a thousand microseconds in a millisecond, and a million microseconds in a second. | ||||||||||||||
| 3 | This function is used to return the number of milliseconds at the time, the Arduino board begins running the current program. | ||||||||||||||
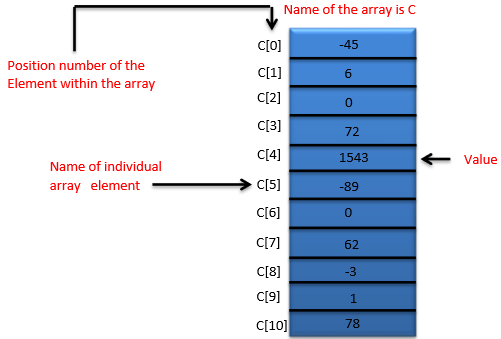
| 4 | The micros() function returns the number of microseconds from the time, the Arduino board begins running the current program. This number overflows i.e. goes back to zero after approximately 70 minutes. An array is a consecutive group of memory locations that are of the same type. To refer to a particular location or element in the array, we specify the name of the array and the position number of the particular element in the array. The illustration given below shows an integer array called C that contains 11 elements. You refer to any one of these elements by giving the array name followed by the particular element’s position number in square brackets ([]). The position number is more formally called a subscript or index (this number specifies the number of elements from the beginning of the array). The first element has subscript 0 (zero) and is sometimes called the zeros element. Thus, the elements of array C are C[0] (pronounced “C sub zero”), C[1], C[2] and so on. The highest subscript in array C is 10, which is 1 less than the number of elements in the array (11). Array names follow the same conventions as other variable names.
A subscript must be an integer or integer expression (using any integral type). If a program uses an expression as a subscript, then the program evaluates the expression to determine the subscript. For example, if we assume that variable a is equal to 5 and that variable b is equal to 6, then the statement adds 2 to array element C[11]. A subscripted array name is an lvalue, it can be used on the left side of an assignment, just as non-array variable names can. Let us examine array C in the given figure, more closely. The name of the entire array is C. Its 11 elements are referred to as C[0] to C[10]. The value of C[0] is -45, the value of C[1] is 6, the value of C[2] is 0, the value of C[7] is 62, and the value of C[10] is 78. To print the sum of the values contained in the first three elements of array C, we would write − Serial.print (C[ 0 ] + C[ 1 ] + C[ 2 ] ); To divide the value of C[6] by 2 and assign the result to the variable x, we would write − x = C[ 6 ] / 2; Declaring ArraysArrays occupy space in memory. To specify the type of the elements and the number of elements required by an array, use a declaration of the form − type arrayName [ arraySize ] ; The compiler reserves the appropriate amount of memory. (Recall that a declaration, which reserves memory is more properly known as a definition). The arraySize must be an integer constant greater than zero. For example, to tell the compiler to reserve 11 elements for integer array C, use the declaration − int C[ 12 ]; // C is an array of 12 integers Arrays can be declared to contain values of any non-reference data type. For example, an array of type string can be used to store character strings. Example 1: Declaring an Array and using a Loop to Initialize the Array’s ElementsThe program declares a 10-element integer array n. Lines a–b use a For statement to initialize the array elements to zeros. Like other automatic variables, automatic arrays are not implicitly initialized to zero. The first output statement (line c) displays the column headings for the columns printed in the subsequent for statement (lines d–e), which prints the array in tabular format. Example int n[ 10 ] ; // n is an array of 10 integers void setup () { } void loop () { for ( int i = 0; i < 10; ++i ) // initialize elements of array n to 0 { n[ i ] = 0; // set element at location i to 0 Serial.print (i) ; Serial.print (‘\r’) ; } for ( int j = 0; j < 10; ++j ) // output each array element's value { Serial.print (n[j]) ; Serial.print (‘\r’) ; } } Result − It will produce the following result −
Example 2: Initializing an Array in a Declaration with an Initializer ListThe elements of an array can also be initialized in the array declaration by following the array name with an equal-to sign and a brace-delimited comma-separated list of initializers. The program uses an initializer list to initialize an integer array with 10 values (line a) and prints the array in tabular format (lines b–c). Example // n is an array of 10 integers int n[ 10 ] = { 32, 27, 64, 18, 95, 14, 90, 70, 60, 37 } ; void setup () { } void loop () { for ( int i = 0; i < 10; ++i ) { Serial.print (i) ; Serial.print (‘\r’) ; } for ( int j = 0; j < 10; ++j ) // output each array element's value { Serial.print (n[j]) ; Serial.print (‘\r’) ; } } Result − It will produce the following result −
Example 3: Summing the Elements of an ArrayOften, the elements of an array represent a series of values to be used in a calculation. For example, if the elements of an array represent exam grades, a professor may wish to total the elements of the array and use that sum to calculate the class average for the exam. The program sums the values contained in the 10-element integer array a. Example const int arraySize = 10; // constant variable indicating size of array int a[ arraySize ] = { 87, 68, 94, 100, 83, 78, 85, 91, 76, 87 }; int total = 0; void setup () { } void loop () { // sum contents of array a for ( int i = 0; i < arraySize; ++i ) total += a[ i ]; Serial.print (“Total of array elements : ”) ; Serial.print(total) ; } Result − It will produce the following result − Total of array elements: 849 Arrays are important to Arduino and should need a lot more attention. The following important concepts related to array should be clear to a Arduino −
|
Comments
Post a Comment